
July 18, 2013
We've got action!

July 13, 2013
I was thinking about our composts yesterday as we were planting and thought it would be interesting to run a soil test on each component to see exactly what we were dealing with. Many times we work compost into our gardens because we know it's a good thing to do, but I have never really given much thought to what exactly I was putting into my soil! I will re-run the test in a few months after the traditional compost has broken down even more, but so far, the worm compost is the most potent and the most acidic to counteract the alkalinity levels in our soil. I also saw, based on the results of the Soil Mix test, that it really can be necessary to add in some extra nutrients. Check out my findings below (click on image to make it bigger)!

July 12, 2013
The compost war is on! Since it has been so long between posts here, let me give you a little recap. Monica & I started a compost project last fall, each of us using a different method of composting to see which was was easier and/or more effective. I started mine using the vermiculture method (composting with worms), and Monica started a traditional compost pile in a tumbler. We have learned that worm composting is MUCH faster, but you can't compost quite as much as you are able to with traditional composting. Monica's compost took much longer than we originally thought it was going to (the contents should have been shredded a little finer for expediency), but we took a look at it and decided it was close enough to run our experiment--an experiment to see who's compost works the best! We are both growing the same seeds ('Jack-Be-Little' Pumpkins), in the same amount of soil each using 1/4 c. of our compost to amend with. We hope to see some action soon!


August 13, 2012
From Monica:
July 26, 2012
From Monica:
Just wanting to fill you in on the progress of my compost! For the last few weeks I have been closely monitoring the moisture level and watching the temperature as I add more brown and green materials. I am not getting a lot of heat, but I have made it up to 111 degrees F. As I watch the heat throughout the day, it usually goes up and down with the temperature outside, but it has been consistently hot enough to get the process going. Every time I take the lid off I get a nice waft of steam, and I am noticing a white ash-like coating on the materials, along with an earthy scent. This is where it should be! I did have a little bit of a smell problem a few days ago. This was caused by too much water and not enough brown materials. So, to remedy this problem, I added some shredded newspaper to soak up the water. To help matters even more, my bunny Little John made some contributions of his own! Now we're back in business!
From Laura:
I just received my Worm Factory 360! I will be setting it up on Saturday as part of a demonstration during Monica's composting class. I will then order worms next week and get the compost going!
June 28, 2012
From Monica:
The compost project has begun! I spent some time earlier this week finding a spot for my compost tumbler. One should keep in mind that compost should be treated like a shade-loving plant, getting sun in the morning and shade in the afternoon. With this in mind, I decided on an area behind our potting shed because it gets the proper amount of sun/shade exposure. The Tumbler is now set up!
The first layer to go in my bin was dried leaves about 5 inches deep. I then covered the leaves with a 2 inch deep layer of greens that I gathered from weeding and grooming projects done in the nursery. After the brown and green layers were in, I added a cup of compost activator (The ratio is one cup=16sq. ft of compost). Now for some moisture! I made sure all the materials were wet by pouring some water slowly in with a watering can. Your materials should have the moisture level of a wrung out sponge. Then came the fun part...I grabbed a hold of that tumbler and started spinning!
Now let the decomposing begin!


December 10, 2011
When you take a look at all the different types of compost with their varying results, then listen to all the different opinions about each one, it makes it hard to decide which method and type of compost you want to produce! We want to shed a little light on the subject by conducting a 'compost test'.
We are each going to choose a different composting method, make some, then do a controlled growing test. We will select the same seed, use the same soil, same watering methods, same growing sight, but we will amend each of our pots with our different homemade composts.
 May the best compost win!
Notes from the composters:
From Monica:

 From Laura:
From Susan:
Composting method to be chosen soon!
______________________________________
December 9, 2011
This spring we will be setting out on a compost adventure! We are going to try out and share different composting methods, recipes, tips, and tricks on this page! There is so much to learn, so any advice, tips, questions, and/or comments are greatly welcomed!
We've got action!

We may begin a second set to make sure of the results. Monica and I were gone for a few days, and these were not watered. So, we can gather that the worm compost soil retains more moisture than the traditional. I'm sure the traditional is not far behind. Until then, I won't brag about who's compost is winning... :) ~Laura
July 13, 2013
I was thinking about our composts yesterday as we were planting and thought it would be interesting to run a soil test on each component to see exactly what we were dealing with. Many times we work compost into our gardens because we know it's a good thing to do, but I have never really given much thought to what exactly I was putting into my soil! I will re-run the test in a few months after the traditional compost has broken down even more, but so far, the worm compost is the most potent and the most acidic to counteract the alkalinity levels in our soil. I also saw, based on the results of the Soil Mix test, that it really can be necessary to add in some extra nutrients. Check out my findings below (click on image to make it bigger)!

P.S. Soil tests are cheap and really easy to use! Definitely something I will be doing at home!
July 12, 2013
The compost war is on! Since it has been so long between posts here, let me give you a little recap. Monica & I started a compost project last fall, each of us using a different method of composting to see which was was easier and/or more effective. I started mine using the vermiculture method (composting with worms), and Monica started a traditional compost pile in a tumbler. We have learned that worm composting is MUCH faster, but you can't compost quite as much as you are able to with traditional composting. Monica's compost took much longer than we originally thought it was going to (the contents should have been shredded a little finer for expediency), but we took a look at it and decided it was close enough to run our experiment--an experiment to see who's compost works the best! We are both growing the same seeds ('Jack-Be-Little' Pumpkins), in the same amount of soil each using 1/4 c. of our compost to amend with. We hope to see some action soon!


August 13, 2012
From Monica:
Time for a compost update! I am at a point where I am letting the compost sit and do its thing. I turn it and check its moisture about twice a week, and soon I will turn it once a week. I have stopped adding materials because my compost is looking good and smelling earthy. I want to give this batch a chance to break down quite a bit before adding new materials, if I even add them. I am excited because I can see that my compost is starting to shrink and all the materials are taking on the same nice brown color. This means that the materials are breaking down properly!
I ran into a snag last week. I put coffee grounds into my compost without balancing them with some brown materials. To remedy this problem, I turned the pile to give it more air, and I monitored the moisture level to make sure it didn't get any more water. I then added some shredded newspaper. This soaked up the extra water and brought the balance of browns and greens back to its rightful place.
Now I'm just waiting to see this batch turn into beautiful, rich compost! It takes time, but it will be worth it!
July 26, 2012
From Monica:
Just wanting to fill you in on the progress of my compost! For the last few weeks I have been closely monitoring the moisture level and watching the temperature as I add more brown and green materials. I am not getting a lot of heat, but I have made it up to 111 degrees F. As I watch the heat throughout the day, it usually goes up and down with the temperature outside, but it has been consistently hot enough to get the process going. Every time I take the lid off I get a nice waft of steam, and I am noticing a white ash-like coating on the materials, along with an earthy scent. This is where it should be! I did have a little bit of a smell problem a few days ago. This was caused by too much water and not enough brown materials. So, to remedy this problem, I added some shredded newspaper to soak up the water. To help matters even more, my bunny Little John made some contributions of his own! Now we're back in business!
From Laura:
I just received my Worm Factory 360! I will be setting it up on Saturday as part of a demonstration during Monica's composting class. I will then order worms next week and get the compost going!
June 28, 2012
From Monica:
The compost project has begun! I spent some time earlier this week finding a spot for my compost tumbler. One should keep in mind that compost should be treated like a shade-loving plant, getting sun in the morning and shade in the afternoon. With this in mind, I decided on an area behind our potting shed because it gets the proper amount of sun/shade exposure. The Tumbler is now set up!
The first layer to go in my bin was dried leaves about 5 inches deep. I then covered the leaves with a 2 inch deep layer of greens that I gathered from weeding and grooming projects done in the nursery. After the brown and green layers were in, I added a cup of compost activator (The ratio is one cup=16sq. ft of compost). Now for some moisture! I made sure all the materials were wet by pouring some water slowly in with a watering can. Your materials should have the moisture level of a wrung out sponge. Then came the fun part...I grabbed a hold of that tumbler and started spinning!
Now let the decomposing begin!


From Laura:
Just ordered our vermiculture equipment! Soon we will be home to 1 pound of redworms who will be paying for their stay with some great compost!
December 10, 2011
When you take a look at all the different types of compost with their varying results, then listen to all the different opinions about each one, it makes it hard to decide which method and type of compost you want to produce! We want to shed a little light on the subject by conducting a 'compost test'.
We are each going to choose a different composting method, make some, then do a controlled growing test. We will select the same seed, use the same soil, same watering methods, same growing sight, but we will amend each of our pots with our different homemade composts.
Notes from the composters:
From Monica:
There are so many different ways to compost, and I can't believe how many things you can recycle in the process! I would like to try several of the different techniques I've read about, but I have decided to start with a hot "banner batch" in the spring. This is a batch that has specific ingredients that cause the pile to get hot and decompose very quickly. (It's a great way to go if you're composting diseased plants or weedy materials. Indeed, this is why they are sometimes called "Hospital Heaps." The heat helps to "cure" the plants of these ailments.) I am the type that likes to see quick results so this sounds like the kind of project for me! Can't wait for the spring so I can get "cooking" on my compost!
From Laura:
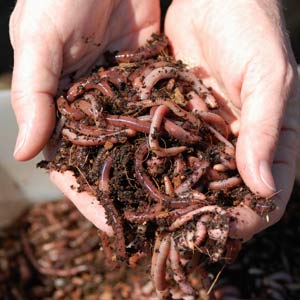
Worms aren't everyone's cup of tea, but I don't mind them!
I have decided to dabble in vermiculture (composting with worms)! After you have your worm bin and worms, you are ready to create compost with little effort, little space, and no smell! (Love that idea!) For point of reference, the worm bin I have ordered is only 16" square and stands 24" tall! This system includes 5 trays and can house 6,000 worms! As far as recycling kitchen refuse, you can recycle up to 1/2 lb. of food scraps per day if you have a worm population of 1,000. So, under optimum conditions, my 5-tray worm bin will be able to work through 3 lbs. of kitchen scraps per day! Though it takes a bit longer to see results than going with the "banner batch" method, it is said to create a fairly potent product, meaning a little goes a long way!
From Susan:
Composting method to be chosen soon!
______________________________________
December 9, 2011
This spring we will be setting out on a compost adventure! We are going to try out and share different composting methods, recipes, tips, and tricks on this page! There is so much to learn, so any advice, tips, questions, and/or comments are greatly welcomed!

Keep checking in! We hope to get this journey started soon!